Wednesday, December 7, 2011

Winter Intermission Update

Progress on the Locost has stalled recently due to several factors including a jealous Jeep Cherokee that needs to be readied for winter.
Auto parts offer some really good online deals in December making it an ideal time to buy parts. The exhaust pipes and muffler on the Jeep are riddled with pin holes and the catalytic converter rattles so replacements have been ordered. The actual work of replacing them however may wait until either the noise becomes unbearable or the weather warms up!
More recently the power steering pump on the Jeep self-destructed causing the serpentine belt to completely lose tension. This lead to the loss of alternator voltage, power steering, and coolant circulation… luckily I noticed the heavy steering and quickly pulled over before the engine overheated. It happened an hour from home, but Stephanie and I were able to track down parts at surrounding parts stores and had it running by days end.
Aside from that I cut some rusty spots out of the Jeep body and welded patches in before spraying with bed liner. This of course led to the discovery of more rusting areas which will be tackled some other day- when it’s warmer.
My latest project involves replacing the awful stock headlights. Nearly all of my driving is done on dark two lane back roads, so having better lights will make a major difference! I’ve made an upgraded harness complete with heavier wiring, fuses, and relays and have ordered a set of Hella E-Code headlamps that utilize H4 Halogen bulbs. Feedback on the Jeep XJ forums indicates this system drastically improves performance without the expense of HID projector retrofits. As a minimum I’ll replicate the same system on the Locost.
If you’re considering retrofitting HID projectors on a vehicle you may wish to visit The Retrofit Source to see their complete conversion kits. I’m currently daydreaming about swapping out the standard “Blazer” projector fog lights on the Camaro with a set of identical-looking Blazer HIDs and could definitely see a set of HID projectors integrated into the Locost… even though they are not “low cost”.
As far as wiring harness supplies Waytek Inc offers some really nice options.

Monday, October 24, 2011

Milestone #1 reached

After having some issues trying to find a place to take the scrap steel from the Miata unibody I stumbled across a great lead (thanks Ken!). The local scrap metal dealer balked when I mentioned it was the shell of an old car, and they directed me to a salvage yard. The salvage yard refused to take it if it didn’t have items of value still attached such as the engine and transmission.

I mentioned my dilemma to a friend at work and he remembered one of our guys was collecting scrap metal on the side. We called him up and he wants it! Here’s proof that you actually can load a Miata into the back of your pickup truck even if it only has a 6’ bed… as long as you take enough off of it and cut the remaining pieces small enough.


The first milestone has officially been reached: the donor car has been stripped, is out of the way, and most all the unnecessary parts have already been sold off!

Monday, October 17, 2011

Ever cut a car in half?

This weekend was a real stress reliever… the old Miata is now largely cut up into smaller easier to carry pieces. Some parts of the process were pretty interesting to say the least, but Stephanie helped me avoid doing anything too amazingly dumb. After mangling one saw blade and breaking the attachment end off another I only have a small amount left to cut up. New blades are now waiting in the garage to finish the project tonight. By midweek I hope to haul off the pieces to the local scrap yard.

My next small diversion will include cutting the rusted section of metal off the bottom of the door on my Cherokee and welding in some fresh metal. The Camaro and Miata will soon be in storage and the Jeep has quite a bit that needs attention prior to winter setting in.

Saturday, October 8, 2011

Stripped to the bone!

I took advantage of the perfect weather today and removed everything else from the Miata unibody. Before I cut it up I decided to put an ad on Craigslist to see if any racers want to pick it up for $50; it would at least save me the hassel of cutting it up and moving it! The unibody itself is light enough that my wife and our exchange daughter can each grab a side and pick it up- I'd guess it's around 200 pounds.

I'm getting pretty excited now that the Miata is disappearing. All the work thus far has been preparation for the project which will soon begin in earnest!


Thursday, October 6, 2011

Almost ready to cut up the old Miata


More progress has been made on ripping the Miata apart… the gas tank, dash board, and steering column have been removed leaving very little to be done before the body can be cut up and disposed of. Everything has been carefully labeled as it was taken apart which should make trimming the unneeded wires from the harness easier as well as wiring up the Locost in its final stages.


Pulling the gas tank was nerve-wracking affair as it still had about 5 gallons of fuel sloshing around. The dashboard was also a little bit of a trick due to the large number of connectors that needed to be disconnected before it would pull free.

The big disappointment was jumping on eBay to check on prices of airbags and some other typically high value parts and discovering there were many similar parts listed at very low prices! Miata cars and parts are very seasonal. Parts are worth more and are much easier to sell in Spring. Later in the year when spec Miata racing is in season there are a lot of racers buying wrecked Miatas, tearing them apart, and selling off the parts they don’t need. I'm in no particular hurry, so I can wait until the right time to list parts for sale.

All that remains now is the wiring harness, the brake and gas lines, and a few minor items that are easily removed. I’m hoping this weekend gives me a chance to clear the shell out of the garage and move the smaller parts into the basement. Over winter I can spend some time reconditioning some of the parts I’ll need and maybe sell off more of the parts; I’d like to start building the chassis in Spring.

Friday, July 22, 2011

New Tools = New Progress

Oh sure I could’ve just grabbed the 400 lbs of engine and accessories, pulled it out of the engine bay with my bare hands, and tossed it into the corner of the garage, but buying an engine hoist spared me from getting coolant on my shoes in the process! The engine stand was a super inexpensive version that cost only slightly more than a wood pallet but is much easier to move around the garage.

Lifting the engine out was pretty straight-forward and uneventful other than disconnecting the fuel line and discovering this part of the system still had some pressure left over. Luckily my cat-like reflexes allowed me to get my face out of the way right after getting hit in the cheek with gasoline. Life sometimes tosses me little reminders to not be stupid and this was one of them. Safety glasses were quickly located before continuing.

The other big development is having a guy in Michigan respond to my ad on Craigslist. He’s got a buddy stopping by Road America this weekend who’s going to drop off $500 in return for the front and rear subframes, the hood, the doors, the internal bumper supports, the power plant frame (ties the tranny to the diff), and all the suspension arms off the car. It’s not as much as I was asking for, but the chance to clear all this stuff out in one shot is worth a discount. My basement will look empty again and I’ll have more room to work in the garage.

The total of money received from selling unneeded parts off the car now totals over $1300. I should be able to make a couple hundred more before the parts are pretty well cleared out and the building of the locost can begin.

Here are some photos of the adventure:


Monday, July 11, 2011

Saturday was a good day and quite a bit of progress was made. The rusty condition of the Miata made things interesting as I had to stop to sweep the pile of rust flakes off the floor every so often- especially after using the impact wrench. The six bolts that hold braces under the rear subframe sheared off further helping along my decision to not reuse the subframe in my chassis design. The exhaust downpipe and transmission are now laying on the garage floor.

It’s starting to look less and less like a car more and more every day.

Friday, July 8, 2011

Break is over- back to work.

There are two sayings you’ll hear quite commonly among car guys. One is known as the “Hotrodders Creed” and states, “fast, cheap, and reliable… pick two”. The other isn’t so much a saying but rather a guideline stating, “whatever you think a major project could take as far as time and money- even in your most conservative estimates- triple each of them and you’ll probably be getting close”.

 How do these apply to my Locost? There’s no doubt the car will be pretty spirited in a straight line and should be a monster in the corners. By basing it on a Miata I should also have a large degree of reliability and affordability built in. My downfall will likely be the upgrades I’d like to build in such as aftermarket retro gauges, a dual master brake system with remote balance bar control, and the fancy racing pedal assembly. While not all completely necessary I think my ideas will add to the driving experience enough to justify the added costs.

With the budget presently remaining under control the only variable that has been slipping quite a bit has been time. Hosting an exchange student, taking a large family vacation last month, and spending a lot of spare time goofing off with my boys had placed the project on hold. I’ve recently been sneaking back into the garage for an hour or two every couple nights and have made some more progress! As of now the donor Miata is sitting on jack stands waiting for the transmission to be pulled. After that I can pull what’s left of the rear subframe/ differential and gas tank. On the front of the car I have yet to pull the dash and have nearly everything ready to lift the engine out. Once those things are complete I will try to sell or cut up the unibody in addition to selling off more parts. Hopefully I can generate the money quickly and begin welding a frame together yet this Fall… my original plan was to have the frame largely completed by winter.

Here you can see the suspension arms are gone as is most of everything else.
The engine is also becoming a lot easier to work on and will be pulled out soon.

Saturday, March 5, 2011

The disappearing Miata...

It's tough to make much progress in winter even with a heater in the garage. Filling the kerosene heater runs about $25 and using the heater for short spans of time each day is terribly ineffecient. I could easily burn through a tank in a weekend of working on and off, so I've held off until I had a span of several hours I could work on the car. In the meantime a cylinder head in my Silverado started leaking coolant into the oil, so I had to drop everything and swap it out for a good one.

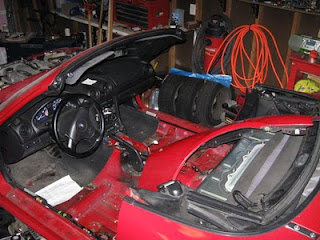
I finally had a few more hours to spend taking the Miata apart: time I refer to as therapy! It feels great to have something to take apart without worrying about how it will go back together! Ok, some of the parts will need to go back together eventually. Last night I pulled off the convertible top, the remote release cables for the fuel lid and trunk, the rear wiring harness, and labelled much more of the wiring harness. Here's what the Miata now looks like:

Oddly enough I've also been getting a serious itch to drive the Miata again and with gas prices going crazy using the Cherokee is getting very expensive. I'm in the processof buying a 1997' Miata to use as my fair weather commuter car. It's the STO edition which can stand for a variety of things depending on who you ask. Special Touring Option, Still The One, or Stuff Taken Off. The STO eliminates some options I would really love to have like cruise control, ABS, and a limited slip differential but adds other things like a tubular exhaust header, leather seats, and much nicer looking 15" alloy rims.

I'm so looking forward to driving my "new" toy and am really hoping this one isn's so much of a crash magnet!

Monday, January 24, 2011

Thinking about a red locost...

I did manage to get some hands on the Miata this weekend even if only for a short time. I pulled all the access panels over the fuel tank and nearby. I also detached the convertible top from rear mounting locations and have only hinges to detach... but first I need to get some pictures of the small tears forming in the top so I can sell it with accurate decriptions.

I was originally thinking about doing something crazy with the paint job on the car but also like how the following picture looks. It's nearly a dead ringer for the color used on the Miata which would be a nice tie-over from the donor car.

Monday, January 17, 2011

Time is precious... and often scarce!

I haven't done much aside from thinking about working on the car lately. I haven't even fired up the welder and used my new gas bottle lately! The Jeep is again needing a few things done and the head replacement for the Silverado is waiting in the wings on some cash before I can buy parts.

In the meantime I've been helping our exchange daughter with some science club projects and have been draawing designs for a tower on AutoCAD and trying to decide if I want to take the plunge and learn SolidWorks for 3D modeling and strength analysis. While these tasks both take time away from getting work done they can both pay off very well if turned towards Locost building. I've got to control myself from getting too crazy as it's easy to be swept into building a conceptual Locost and playing with endless designs versus just building the darn thing. Within reason a car can always be fine-tuned later on.

Still... being able to build the virtual car in 3D does help nail down things like engine mounting, hood clearances, driveshaft placement, etc and can potentially save a lot of wasted time and money later on.

Wednesday, January 12, 2011

Piece by piece...

I had a pretty good hour and half in the garage last night and drained the coolant prior to removing the radiator with fans, the washer fluid resevoir, and some more trim pieces including some minor interior trim. Once the A/C condensor and related lines as well as the sway bar is removed the front end will only be the shell of the unibody. Areas that were once a real pain to access are now literally right out in the open!

It then struck me the work required to label and remove systems from around the engine, unbolt the transmission, and remove the motor could really go quite quickly. Pulling the dash and removing the wiring harness will likely be more involved but still not terribly difficult.

There doen't seem to be a huge amount of interest in the first batch of Miata parts I've listed on eBay through I'm accounting that to having prices marked only slightly lower than the others and giving 100% honest descriptions of the parts with decent photos. I may need to be more aggressive to clean the parts out and should drop some hints with Miata clubs that I'm stripping a 99' out. It may also help once spring draws near.

Tuesday, January 11, 2011

Why does building a Locost take so long? Well...

Yesterday brought some excitement in the form of a bench grinder I received from Northern Tool. Based on some orders before the holidays I received a $50 voucher for use online which I have since used to buy a bench grinder on sale for $49 with free shipping. My end cost was $1.45 for a 8" grinder that so far seems to be perfectly adequate for anything I will need :)

My other big realization is less happy. My Silverado was built with some flawed cylinder heads which allow micro-cracks to form over time. The result is coolant being pushed into the oil. The first time around I was unemployed when I made this less than happy discovery and had to do the repairs at the beginning of February in an unheated WI garage. That was three or four years ago and was the most intensive thing I had ever done as far as repairs. Here's what I found when I opened up the valve covers:


Coolant + oil = sludge and sludge is abrasive. It also plugs up oil passageways, so I was pretty terrified to see a vehicle I maintained to the Nth degree have these issues. GM recognized the problem in a Technical Service Bulletin and claims their supplier used a defective alloy. Despite the "defect" they refuse to stand behind their product which leaves guys like me on our own to replace the heads with known good casting numbers. Avoid any 4.8 or 5.3L GM motor with casting number 706 on the heads to be safe.

At least this time around I caught the problem very early on, have all the tools and experience to fix it, and have a heated garage. The cost to replace a bad head yourself is about $400 in materials and a weekend of time. Having a garage do the work would typically come in around $1500.

On a closing note: this is what the valve train is supposed to look like in a healthy engine. This is the Miata head with 187,000 miles on it (over double the truck's mileage):

Sunday, January 9, 2011

A great weekend of progress :)

I had a pretty good run going on Friday and made some decent progress pulling off the other fender, the doors, most of the carpet, the wiper blades and much of the surrounding trim,and the nearly all of the exhaust before running out of kerosene for the heater on Saturday morning. The big surprise was pulling back the carpeting under the driver's seat and finding $1.45 worth of change which Stephen quickly scooped up: it pays to help dad on a project!

Stephanie is half joking about the Miata disappearing from the garage and reappearing in the basement. She might be half joking, but she's mostly right!


Here's a couple pictures of the basement which used to be quite clean and is now loaded with items being stored for winter, Miata parts, tools for building the Locost, and boxes for packing and shipping Miata parts to good homes. It's going to get a lot more crowded before it gets better... but at least this is only about 1/3rd of my basement.


The kerosene heater is loaded up again and ready for some more

Friday, January 7, 2011

The Miata is losing weight for the New Year...

Here's how the Miata looks tonight...

And here's my welding setup complete with C-25 gas cylinder as well as a motivational bumper sticker:


...and this is an example of what a Locost looks like!


Sharing much of the construction methods and design with race cars builds in a lot of the safety and performance virtues of a racer. The basic chassis construction is known as a space-frame with stressed skin. The aluminum panels contribute to the strength of the chassis while overall weight is kept minimal.

The final car should weight about 1300 lbs compared to 2400+ for my Miata and roughly 3500 for my 98' SS Camaro. This means the Locost using a Miata motor has the same power-to-weight ratio as the V8-powered Camaro... but with FAR better handling.

It all begins with... a wrecked Miata and a dream!

To get this blog started... here's a basic FAQ:

What is a “locost”?
It is a scratch-built kit car based on a car kit that Colin Chapman made and sold in England back in the early 60’s through 70’s. Colin Chapman later would found the Lotus car company and was famous for the concept of “adding lightness” in car design. There’s a story circulating that he became fed up with manufacturers putting a larger engine in a car and then realizing the frame needed to be stronger (heavier) which then required larger brakes and tires. He argued that by adding lightness performance was enhanced in all areas. His car, called the “Lotus Seven” was later sold to and refined by Caterham and is still built in kit form in England.
In years following Ron Chapman wrote a book in England entitiled “How to Build a Sports Car for 250 pounds (British currency) and Race!” which provided instruction on building a space frame and using salvage auto parts to make a Lotus Seven-like car. Mr. Chapman is the man who coined these cars “locosts”.
Why build a “locost”?
Building a car from scratch is as much about the process as it is about the finished product. In all fairness most people that build these cars are never truly done… but they all have some amazing stories of the things they learned. For me this journey will involve learning how to weld and work with a range of tools I’ve never used before such as a right angle grinder, welding equipment, air shear, panel flanger, chop saw, and engine hoist. I see this as a time to spend time learning new skills myself and sharing time with my boys and wife.
The final product will have the running gear out of a Miata but will be packaged in the body of a car that weighs half as much. The suspension resembles a race car more than a street car as will many other aspects of the car. The car will be street-legal to drive and will be very crude in creature comforts compared to a production vehicle, but that is part of the car’s charm. It’s not a car to be driven daily and many people would refuse to drive it if given the chance. Some folks would refuse to even ride in it due to its very small size and almost lack of crash protection.
When did I know I wanted to start the build?
I started looking at builds other people were working on after seeing mention of Locosts on a Miata forum and was captivated by watching a car arise from a pile of steel and a wrecked Miata. In mid-November 2010 my 99’ Miata was first hit in a parking lot and then rear-ended the following day. The sum of the claims was roughly equal to the value of the car, so I decided to pay the car off and start on the process of transforming a wreck into a race car. The balance of the insurance money bought the necessary tools to begin disassembling the Miata and start on welding the space frame chassis.
How long will the build take?
Longer than I think it should and less time than I fear. I’d like to have a completed chassis done by the end of summer. By the end of 2011 I hope to have the engine, rear differential, suspension arms, and some minor systems in place.
By the end of 2012 I hope to have the car running and in drivable condition and expect to shake out any remaining issues prior to spring of 2013.
Will Stephanie and the boys really help and what do they think about this project?
They are certainly welcome to be involved as much as they would like. I bought a second welding helmet and set of protective gear so they can be a part of all stages! I’d like the finished car to be something special to all of us and have elements that each of us can say, “I did that”. Stephanie realizes it is something that will keep me busy in a way that I find very therapeutic and also sees it as a good “bonding time” project with the boys. Samuel doesn’t quite grasp what’s going on, and Stephen misses the Miata terribly. I think he’s having a difficult time seeing the finished project from the concept stage, but he does like hearing about the injured Miata coming back to life with a new body and an entirely different realm of performance.
What are “the Three Questions”?
People that drive these cars mentioned getting a constant stream of the three questions. What is it? Did you build it? How fast does it go? To save time here are the condensed answers: a home-built Lotus Seven-style reproduction, yes, and pretty dang quick.

And here is the beginning of taking the Miata apart...